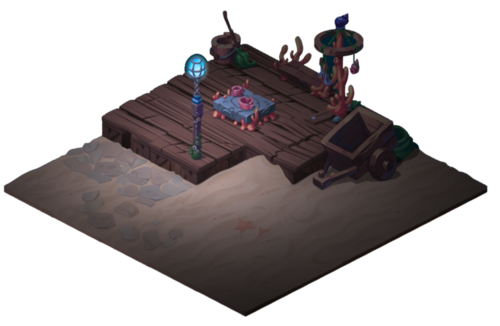
Isometric Environment Lighting : Part II
In the last chapter we explored a technique of
injecting sprite meshes with additional data to implement position based lighting attenuation
for isometric environments.
This chapter builds upon the last by adding normal mapping and implementing Phong lighting model for isometric environment, so it is a good idea to read
First Chapter before continuing.
Before moving back to isometric space, lets take a quick look into normal mapping for 2d in general.
Normal mapping for 2d Assets
I’m sure you are familiar with Normal Mapping,
an approach of creating extra details on a 3d model without additional topology. While generally used for 3D assets, normal maps can have their uses for 2D assets as well.
With 2D assets normal maps can be used to create an illusion of shape that reflects lighting sources. You can produce this effect with Standard shader in Fade mode, or with one of the legacy bumped shaders, by applying it and a normal map to a simple plane mesh or a sprite.
This effect can be achieved with common means, but this is not a standard approach. If your goal is to enhance your 2D assets style with use of normal maps, It is more often than not that you would want more control than you can get with generic shaders. The purpose of standard shaders is to render scene to be as close to photo realistic as possible, and for that goal they will limit user to avoid unrealistic lighting and material setups.
You might want to control effect’s intensity, depth, world and view normal, add cell shading, etc. which may look unrealistic, but will enhance your 2D style.
Adding customization and new features that works with normal maps will require for you to develop custom bumped shaders.
REAL WORLD EXAMPLE
If you interested to know more about GK’s techniques, I would recommend Svyatoslav Cherkasov’s Blogpost that has a rundown of approaches used.
There is a bunch of cool examples out there, but i really like this one. Lazy Bear’s Graveyard Keeper is a great example of bumped pixel-art. Effect is subtle, but you will notice when you play it.
The way GK’s environment is set up it does not require injection of additional position or normal data in to the shader for bump mapping and lighting to work properly.
Generally, objects viewed with orthographic projection (contrary to isometric projection) can be lit by generic light sources without significant shader modifications, although they would always be limited to calculate lighting in fragment shader.
Normal mapping In Isometric space
Generally, unity shaders already handle all transformations required to properly display bumped surfaces.
In our case, since we implemented a custom lighting model to inject PP, we need to recreate normal map transformation ourselves. Otherwise, sampling a normal map and PP will result in lighting skewed to one side.
To properly transform the normal map we need to create a transformation matrix. Imagine it like this. We mainly have 3 normals that we need to add together one by one:
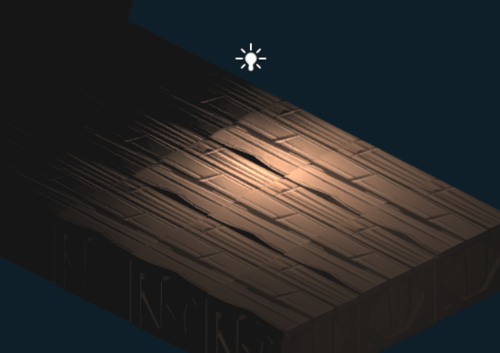
Without normal map transposition, light is skewed towards one side.
1. Normal of the imported mesh.
In our case it is the representation of our environments Isometric angle. If you’ve followed along with steps in first chapter, then you have defined it by rotating mesh inside modeling software before importing it into Unity.
2. Rotation of the Unity object inside the scene.
Self-explanatory. Note that you still would want to implement rotation capability, even if the Tile-like example objects are not the best use case for it. It might be necessary for other type of objects in your scene.
3. Sample from the Normal Map texture.
Normal map will be sampled in fragment shader to represent per pixel details of the surface.

First of all we need to provide mesh normal and tangent property. This is easy to do in Unity by simply setting the calculate option for Normal and Tangent in mesh import settings:

Those specific modes and smoothness sources does not matter in our case, since our mesh is flat.
This shader is based on forward shader we created in Part1, so I will omit PP related explanation here.
New bumped shader is implemented with two forwards passes: “Forward base” pass used to draw first layer of the object, ambient and one directional light. Additional “Forward add” pass draws each per-pixel lighting source that affects the object on top of the base pass.
Before testing, and in case you don’t see a lighting from additional lighting sources, make sure camera rendering path is set to Forward path and lights sources are set to important mode.
Shader "Environment/FragBatchedNormalForward"
{
    Properties
    {
        _MainTex ("Texture", 2D) = "white" {}
        _NormalMap ("Normal Map", 2D) = "bump" {}
        _SpecularViewNormal("Specular View Normal", Vector) = (0,0,0,0)
        _SpecExponent ("Specular Exponent", Range (1.0,50.0)) = 10.0
        _SpecStrength ("Specular Strength", Range (0.0,15.0)) = 1.0
    }
    SubShader
    {
        Tags
        {
            "Queue"="Transparent"
            "IgnoreProjector"="True"
            "RenderType"="Transparent"
            "CanUseSpriteAtlas"="True"
            "DisableBatching" = "True"
        }

        LOD 100
        Lighting On
        ZWrite Off
        Fog { Mode Off }
        Blend SrcAlpha OneMinusSrcAlpha

        Pass
        {
            Tags { "LightMode" = "ForwardBase" }

            CGPROGRAM
            #pragma vertex vert
            #pragma fragment frag

            #include "UnityCG.cginc"
            #include "AutoLight.cginc"
            #include "Lighting.cginc"

            struct appdata
            {
                float4 vertex : POSITION;
                float2 uv : TEXCOORD0;
                float3 color : COLOR;
                float3 unBatchedVertex : TEXCOORD1;
                float3 normal : NORMAL;
                float4 tangent : TANGENT;
            };

            struct v2f
            {
                float2 uv : TEXCOORD0;
                float4 vertex : SV_POSITION;
                float3 percivedVertexMV : TEXCOORD1;
                float3x3 local2WorldTranspose : TEXCOORD2;
            };

            sampler2D _MainTex;
            sampler2D _NormalMap;
            float4 _MainTex_ST;
            float _SpecExponent;
            float _SpecStrength;
            float4 _SpecularViewNormal;

            v2f vert (appdata v)
            {
                v2f o;
                o.vertex = UnityObjectToClipPos(v.vertex);
                o.uv = TRANSFORM_TEX(v.uv, _MainTex);

                // Unbatch current position by using baked in original vertex position.
                float3 batchOffset = v.vertex - v.unBatchedVertex;

                // Note: .w is required for matrix transformation to work.
                float4 perciveblePosition = float4(v.color * float3(1,0.75f,1) + batchOffset, 1);

                // Transform percived vertex in to World Space.
                // Note: This is different from vertex based solution becouse pixel lights are provided in world space.
                o.percivedVertexMV = mul(unity_ObjectToWorld, perciveblePosition);

                // Create local2WorldTranspose matrix.
                float3 tangentWorld = normalize(mul(unity_ObjectToWorld, float4(v.tangent.xyz, 0.0)).xyz);
                float3 normalWorld = normalize(mul(float4(v.normal, 0.0), unity_WorldToObject).xyz);
                float3 binormalWorld = normalize(cross(normalWorld, tangentWorld) * v.tangent.w); // tangent.w is specific to Unity

                o.local2WorldTranspose = float3x3(tangentWorld, binormalWorld, normalWorld);

                return o;
            }

            fixed4 frag (v2f i) : SV_Target
            {
                float4 textureSample = tex2D(_MainTex, i.uv);
                float4 normalSample = tex2D(_NormalMap, i.uv);
                float3 unpackedNormal = UnpackNormal(normalSample);
                float3 positionInWorldSpace = i.percivedVertexMV.xyz;

                // Light.
                float3 lightDirection;
                float3 vertexToLightSource;

                if (0.0 == _WorldSpaceLightPos0.w) // directional light?
                {
                    //This handles directional lights
                    lightDirection = float3(mul(float4(_WorldSpaceLightPos0.xyz, 1.0), unity_ObjectToWorld).xyz);
                    lightDirection = normalize(lightDirection);
                }
                else
                {
                    vertexToLightSource = float3(_WorldSpaceLightPos0.xyz + float3(0,1,0)) - positionInWorldSpace;
                    lightDirection = normalize(vertexToLightSource);
                }

                // Transpose normal so it would look right in isometric space.
                float3 transposedNormal = normalize(mul(unpackedNormal, i.local2WorldTranspose));

                // Compute lighting diffuse and attenuation.
                float normalDotLight = max(0.0, dot(transposedNormal, lightDirection));

                UNITY_LIGHT_ATTENUATION(lightAttenuation, i, positionInWorldSpace);

                fixed3 diffusedColor = textureSample.rgb * _LightColor0.xyz * lightAttenuation * normalDotLight;
                fixed3 ambient = unity_AmbientSky;
                fixed3 mixedColor = diffusedColor + ambient;

                return fixed4(mixedColor, textureSample.a);
            }
            ENDCG
        }

        Pass
        {
            Tags { "LightMode" = "ForwardAdd" }
            Blend One One

            CGPROGRAM

            #pragma vertex vert
            #pragma fragment frag
            #pragma target 3.0

            #include "UnityCG.cginc"
            #include "AutoLight.cginc"
            #include "Lighting.cginc"
            #pragma multi_compile_lightpass

            struct appdata
            {
                float4 vertex : POSITION;
                float2 uv : TEXCOORD0;
                float3 color : COLOR;
                float3 unBatchedVertex : TEXCOORD1;
                float3 normal : NORMAL;
                float4 tangent : TANGENT;
            };

            struct v2f
            {
                float2 uv : TEXCOORD0;
                float4 vertex : SV_POSITION;
                float3 percivedVertexMV : TEXCOORD1;
                float3x3 local2WorldTranspose : TEXCOORD2;
            };

            sampler2D _MainTex;
            sampler2D _NormalMap;
            float4 _MainTex_ST;
            float _SpecExponent;
            float _SpecStrength;
            float4 _SpecularViewNormal;

            v2f vert (appdata v)
            {
                v2f o;
                o.vertex = UnityObjectToClipPos(v.vertex);
                o.uv = TRANSFORM_TEX(v.uv, _MainTex);

                // Unbatch current position by using baked in original vertex position.
                float3 batchOffset = v.vertex - v.unBatchedVertex;

                // Note: .w is required for matrix transformation to work.
                float4 perciveblePosition = float4(v.color * float3(1,0.75f,1) + batchOffset, 1);

                // Transform percived vertex in to World Space.
                // Note: This is different from vertex based solution becouse pixel lights are provided in world space.
                o.percivedVertexMV = mul(unity_ObjectToWorld, perciveblePosition);

                // Create local2WorldTranspose matrix.
                float3 tangentWorld = normalize(mul(unity_ObjectToWorld, float4(v.tangent.xyz, 0.0)).xyz);
                float3 normalWorld = normalize(mul(float4(v.normal, 0.0), unity_WorldToObject).xyz);
                float3 binormalWorld = normalize(cross(normalWorld, tangentWorld) * v.tangent.w); // tangent.w is specific to Unity

                o.local2WorldTranspose = float3x3(tangentWorld, binormalWorld, normalWorld);

                return o;
            }

            fixed4 frag (v2f i) : SV_Target
            {
                float4 textureSample = tex2D(_MainTex, i.uv);
                float4 normalSample = tex2D(_NormalMap, i.uv);
                float3 unpackedNormal = UnpackNormal(normalSample);

                float3 positionInWorldSpace = i.percivedVertexMV.xyz;

                // Light.
                float3 lightDirection;
                float3 vertexToLightSource;

                if (0.0 == _WorldSpaceLightPos0.w) // directional light?
                {
                    //This handles directional lights
                    lightDirection = float3(mul(float4(_WorldSpaceLightPos0.xyz, 1.0), unity_ObjectToWorld).xyz);
                    lightDirection = normalize(lightDirection);
                }
                else
                {
                    vertexToLightSource = float3(_WorldSpaceLightPos0.xyz + float3(0,1,0)) - positionInWorldSpace;
                    lightDirection = normalize(vertexToLightSource);
                }

                // Transpose normal so it would look right in isometric space.
                float3 transposedNormal = normalize(mul(unpackedNormal, i.local2WorldTranspose));

                // Compute lighting diffuse and attenuation.
                float normalDotLight = max(0.0, dot(transposedNormal, lightDirection));

                UNITY_LIGHT_ATTENUATION(lightAttenuation, i, positionInWorldSpace);

                // Specular.
                float specularLight;

                if (normalDotLight < 0.0)
                {
                    // Light is on the wrong side, no specular reflection
                    specularLight = 0.0;
                }
                else
                {
                    // A little hack to squew specular light towards camera.
                    // For generic implementation you can replace it with World Up float3(0, 1, 0).
                    float3 viewDirection = _SpecularViewNormal.rgb;
                    specularLight = lightAttenuation * pow(max(0.0, dot(reflect(-lightDirection, transposedNormal), viewDirection)), _SpecExponent);
                }

                fixed3 specularReflection = _LightColor0.xyz * specularLight  * _SpecStrength;
                fixed3 diffusedColor = textureSample.rgb * _LightColor0.xyz * lightAttenuation * normalDotLight;
                fixed3 mixedColor = (specularReflection + diffusedColor) * textureSample.a;

                return fixed4(mixedColor, 0);
            }
            ENDCG
        }
    }
}
As you can see, by adding matrix transformation we can achieve passable surface normal on an isometric billboard object. Using normal data we can implement diffuse and specular reflection, effectively re-creating Phong lighting model.
Specular highlight can be useful to display material properties like metal and wet surfaces.
What I like to do, in isometric environments, is to skew world normal a little in such a way to move the specular highlight closer towards the camera and push the highlight further from the diffuse center. This hack makes the effect more noticeable and adds more contrast, but it may not work for you, so I've commented this part out, in shader code, for you to try yourself.
Note that actual objects are still a simple billboards.
However, on the shader level we injected enough data to fully implement dynamic lighting diffusion as well as any other effect we can normally achieve with 3D objects.
CREATING NORMAL MAPS FOR 2D ASSETS
Personally, I don’t have enough experience producing normal maps to give you solid advice on the best approach.
Still, I’ve gathered an overview of several approaches and few useful links just to give you the start point for further reading.
So, how can you create normal maps for your 2D assets?
Render Normal Maps from 3D objects
In case your 2D graphic assets are rendered from 3D objects, it would be trivial to render normal maps as well as diffuse maps using the same rendering software.
This approach is used in games such as Pillars Of Eternity. Initially POE background is modeled as a 3D environment and later rendered into Diffuse, Normal and Depth maps.
Super easy, but available only if you have 3D source to work with.

Generate Normal Map from Diffuse
Normal map generators like CrazyBump and Knald have been in use inside 3D production workflows for quite a while. Generally they used to generate finer details, not the shape of the whole object, and they work best with delighted textures that doesn’t have obvious light and dark shades.
This is not the best choice for painted 2D assets, but in some cases you can use generators to extract fine details to combine with normal maps form different approaches.
Here is Free Online Normal Map Generator for you to try yourself.
SpriteIlluminator - Another tool that I should mention.
Interesting feature here is that it allows to generate an object shape. It is, probably, not something that will work with isometric objects, but its worth a look.


Normal Map Generated in Knald.
Normal Maps from 4 grayscale diffuse maps
You can manually paint 4 directional grayscale layers over your base asset, and combine them into a normal map. Overall it is a more time-consuming approach but it produces a good results.
This approach can be used with SpriteLamp, a tool that can make this process easier, and has additional features like normal adjustment, depth and AO generation options.
In case you would want to combine normal maps yourself, here is a great tutorial of how to use Photoshop to create normal maps from combining 4 grayscale images. This one explains the process with photography, but the process for combining painted layers would be the same: http://zarria.net/nrmphoto/nrmphoto.html.

Normal Maps by painting with normals
Just recently I stumble upon this approach of directly with normal colors by using a normal sphere as a color pallet in Photoshop.
This approach results in more precise control of normal direction and ability to define large object shape, all without a hustle of 4 directional textures merging.
It may take some time to get efficient at, but I believe it may be a very effective approach of drawing normal maps for isometric objects. Author, Nick Lewis has a YouTube channel that includes a tutorial and time-lapse videos of painting process of hard and soft edge objects. Definitely worth a look.